
Table of Contents
Overview
In this post I will explain how I setup Google WorkFlow Identity Federation so that it can be used from GitHub Actions.
Workflow Identity federation is a great way to connect your GitHub CI/CD pipelines when operations are needed on Google Cloud. This approach enhances security compared to previous approaches where one had to save a credentials JSON file and upload it on GitHub as a secret.
With this approach, GitHub generates a token for every build and then presents it to Google Cloud which asserts it. If the credentials are valid, any subsequent step in your GitHub action that requires an activity on Google Cloud will be allowed, based on the permissions you have granted.
References
Google provides extensive documentation on Workflow Identity Federation. However I find that the amount of information might be a bit overwhelming, especially for people coming new at this. This is why I’ve decided to create this post. I have been through the documentation and I have found a setup that works for me (so far). I’ve used it to setup CI/CD pipelines to deploy Microservices on Google Cloud Run and to use the Google Text-To-Speech service. I want to list here the references to Google official documentation so that you have a place where to investigate further, should you wish to do so.
- How to setup Google Identity Federation for Deployment Pipelines. This is the main guide I have followed to learn about this setup
- Google GitHub Actions setup. I found this guide useful in understanding which attributes the GitHub Action token provides
- Google CEL Spec. Describes the Common Expression Language (CEL) used in the assertion conditions.
Logical Steps to setup Google Workflow Identity Federation
These are the logical steps required to create Google Workflow Identity Federation with an external GitHub Action provider:
- Have a Google project ready, enable the required APIs for your build and be ready to extract the project id
- Create a Workflow Identity Pool
- Create an Identity Provider and define the token mappings and the conditions to grant access
- Create a Service Account in the project and assign it the appropriate roles
- Use the Google GitHub Actions plugin in your GitHub action to allow GitHub to authenticate on your Google workflow Identity Pool
- Test the CI/CD pipeline
Ready your Google project
This is the easiest of tasks. You might already have a Google project or, if not, create a new one.
Enable your APIs
You can manage your project’s APIs by heading to the search text field and search for ‘apis & services’ and then select the ‘APIs and Services’ option. In my case the APIs enabled for my project are:

Find your project id
Your project id can be found by clicking the project tab at the top left of the UI:


Create a Workflow Identity Pool and Identity Provider
This is the most critical step and you need to be very precise in setting it up. Head to the search bar, search for ‘workload identity federation’ and select the menu item “Workflow Identity Federation”. You will be presented with the home screen.

Click on the “Create Pool” option on the top bar.
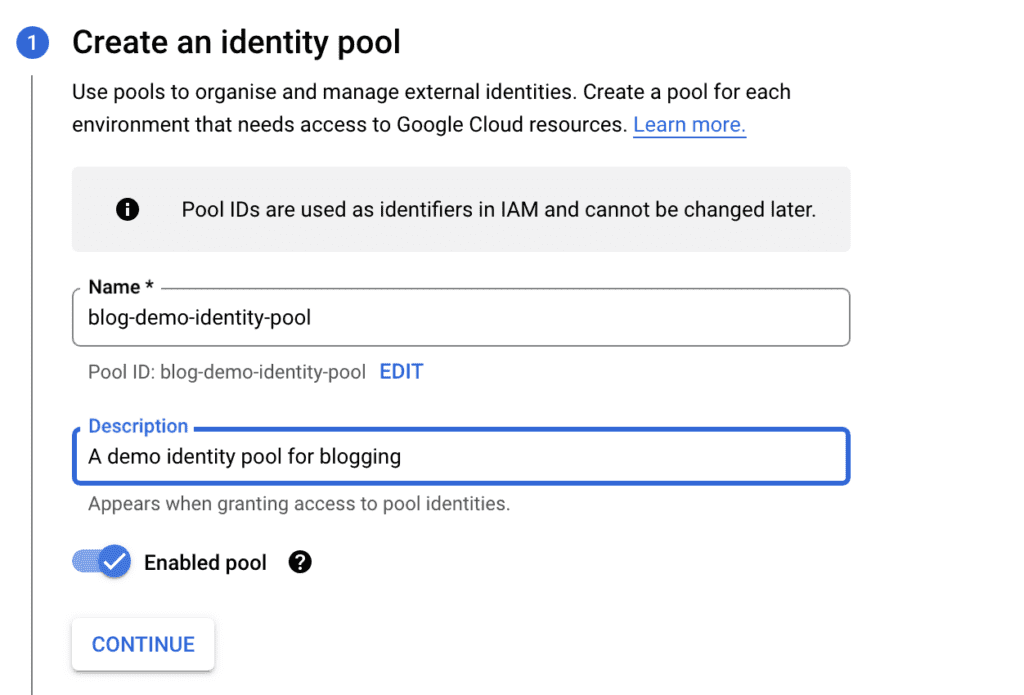
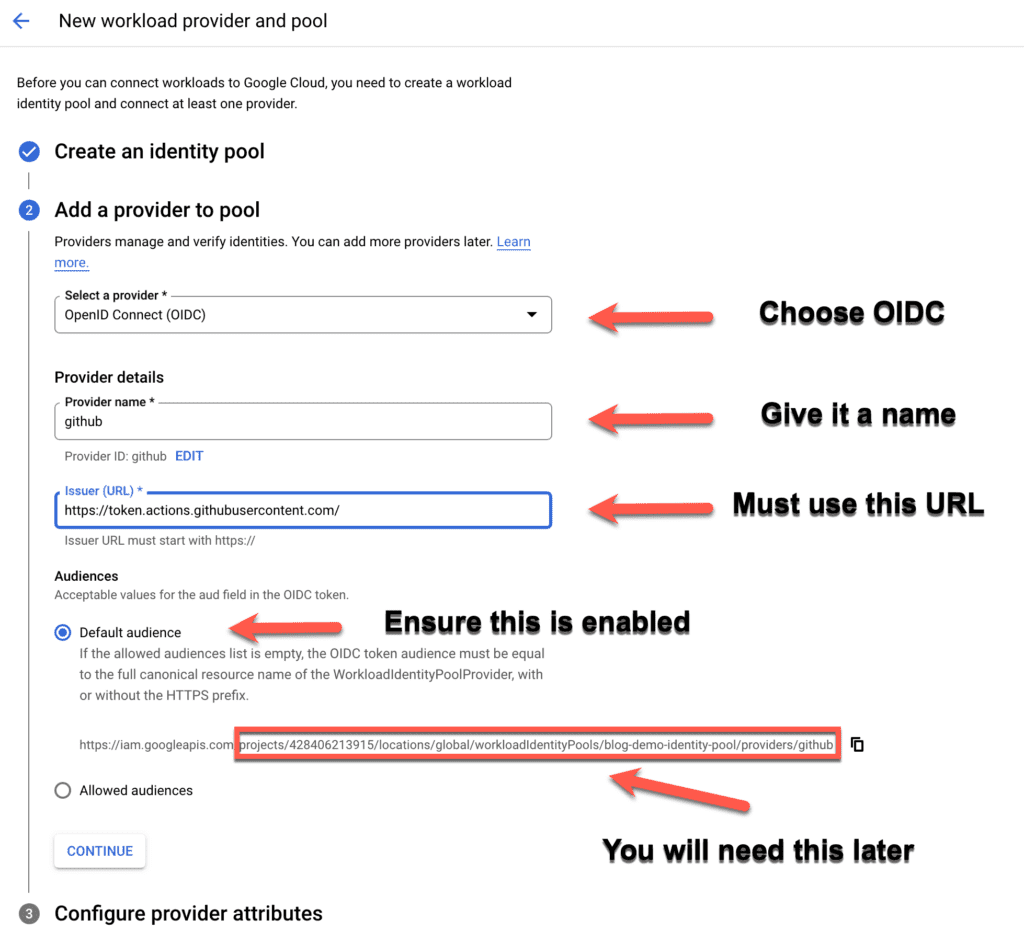
Enter a unique name, a description, make sure “Enabled pool” is on and press “Continue”. Make sure to follow the instructions for the Step 2 below and then press “Continue”
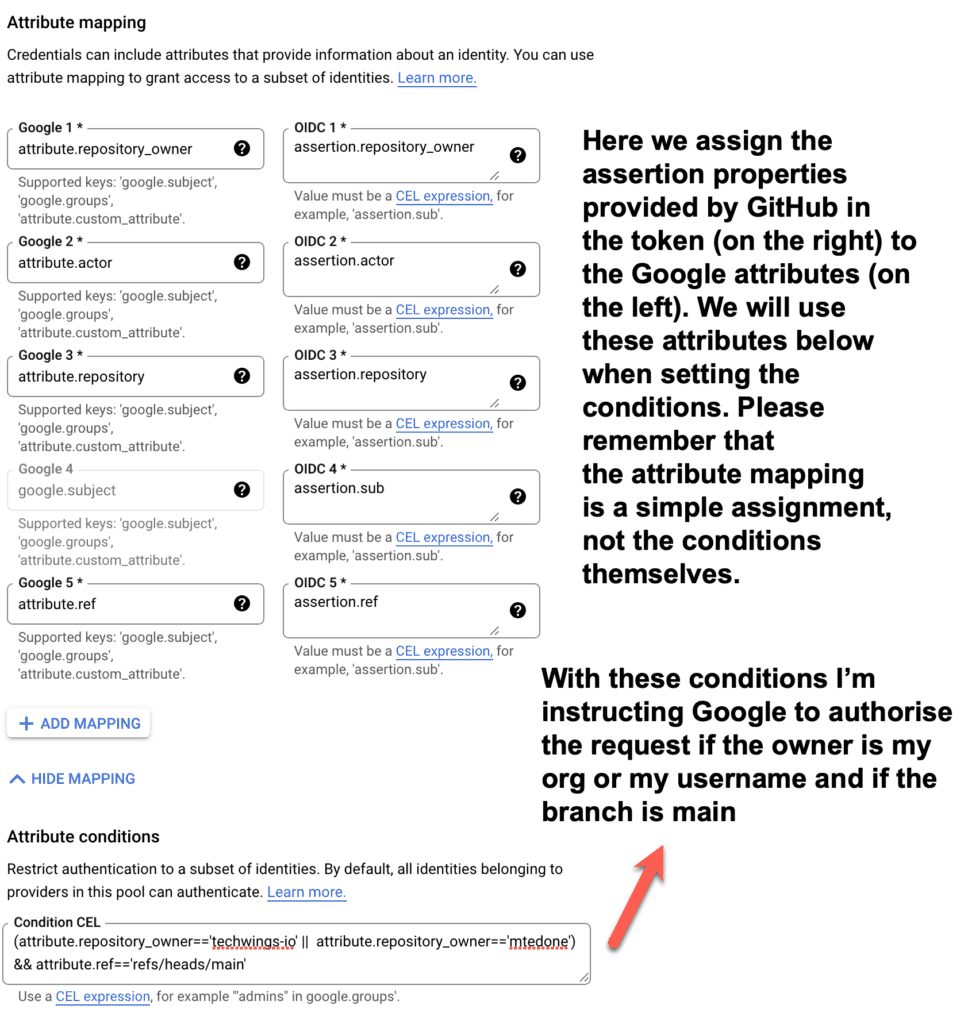
In this third and final step you need to map the assertions contained in the GitHub Action token to some Google attributes so that you can use the attributes below in the Common Expression Language conditions. In the example below Google will authorise the GitHub Action only if the owner is either my org or myself and the branch is main. You can, of course, select different conditions. For a list of assertions contained in the GitHub Action token, please refer to the documentation of the Google GitHub Action setup (link above in the resources). Once done press “Save” and your Identity Pool and Provider will be created.
Setup a Google Service Account and associate it to the Identity Pool
From the search bar, search “Service Accounts” and select the menu item “Service Accounts”. Then select “Create Service Account”.

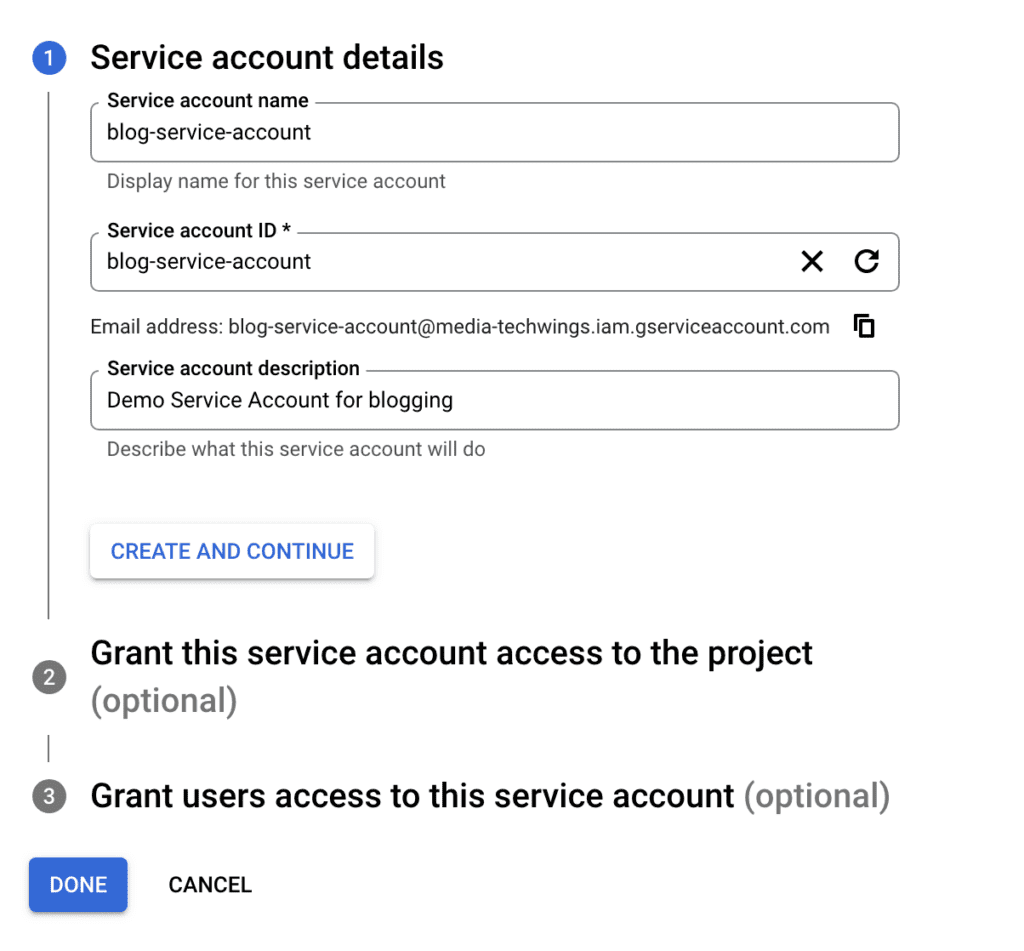
Enter the Service Account name, id and a description, then select “Create and Continue”
Select one or more roles, depending on the services you want to enable for Identity Federation. For most of my apps, I need a number of roles, so I normally select “Editor”, which is kinda of a super user who can manage most resources.
Techwings Limited doesn’t take any responsibility for the harm that might come to you or your business as a consequence of following the steps in this article. It is your responsibility to identify and assign the correct roles for your Google environment.
I don’t normally worry too much about assigning the Editor role because I control the services available from my project through the enabled APIs.

In the third step one can assign additional users access to this service account. It’s an optional step and in my case I generally leave it blank. You can click on “Done”
Very important! You need to add your identity pool principal to the service account
Right now you should see something similar to the following. Don’t worry too much about the exact values: yours will vary depending on your setup. In my grants list for example there are roles appearing that I have deleted. I guess there’s a bit of clean up that needs to happen.
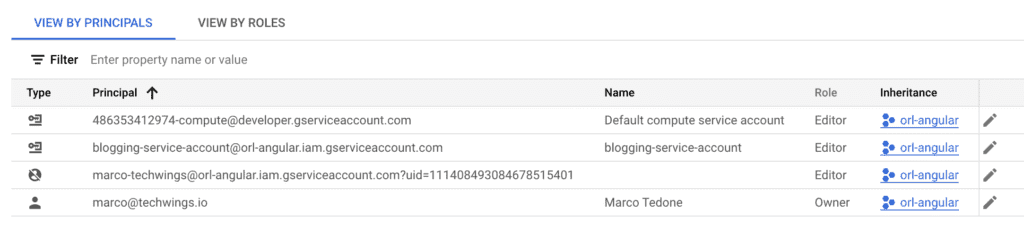
In the case above you will probably see your Google account admin Principal and the service account that you have just created. Now you need to add the identity pool principal to this service account with a role of Workload Identity User. This is a critical step that if not done correctly will result in your GitHub Action hanging and eventually failing. It’s the glue between the Identity Pool used by GitHub and the Google resources that your build wants to use. To do this, first head to your identity pool and copy its IAM principal

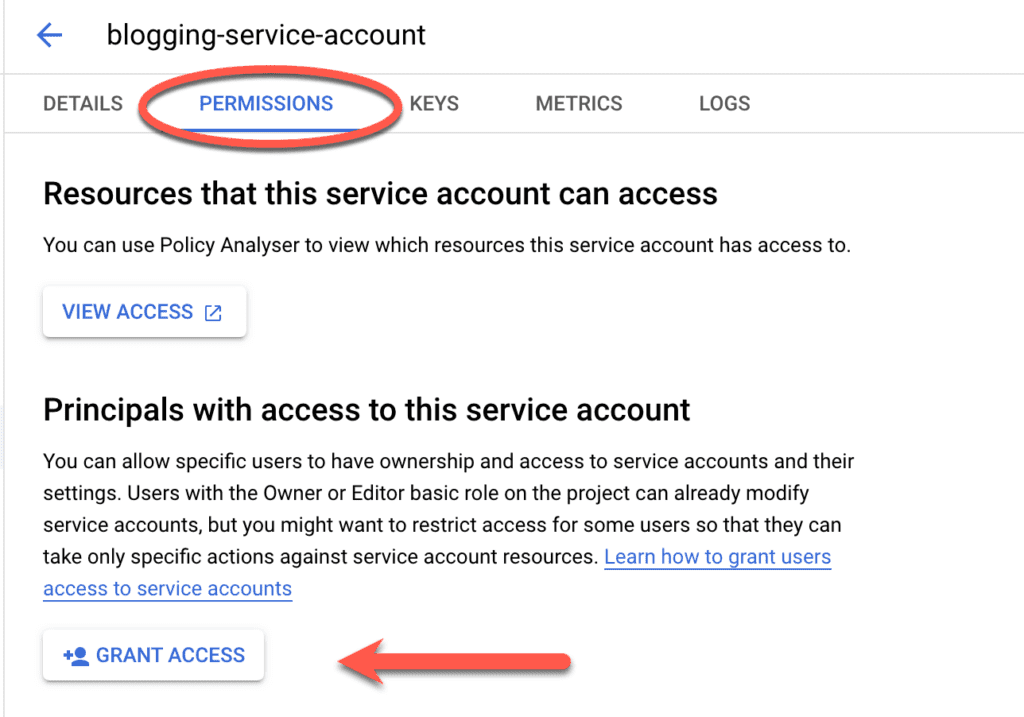
Then select the Service Account from the “Service Accounts” service (you can search for it in the search bar) and click on the “Permissions” tab. Here click the “Grant Access” button,
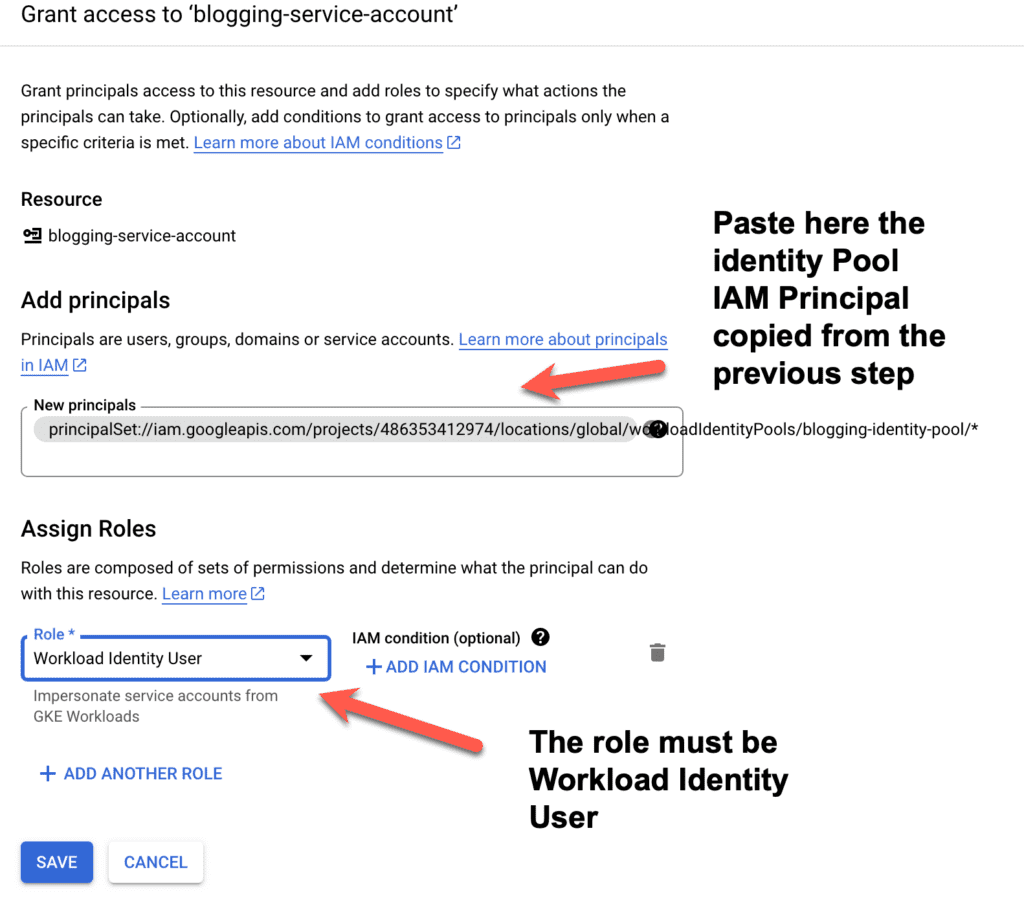
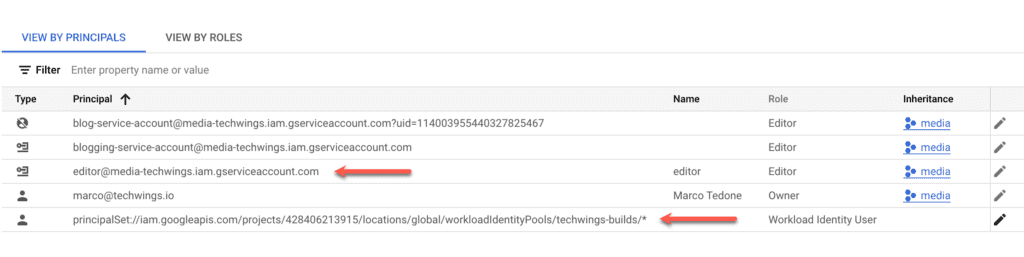
When done press “Save”. You should now see something similar to the picture below (values will vary, but the key elements must be there, as highlighted by the arrows in the picture below)
Congratulations! You are nearly done. The last step is to use what we have setup so far in the GitHub Action.
Configuring GitHub Actions to authenticate via Workflow Identity Federation
Here I will show a GitHub Action that I used in my Text-To-Speech Spring Boot build. The process of authenticating with Google through Workflow Identity Federation remains the same, so you can use it in every GitHub Action requesting access to your Google resources. You will need to key pieces of information for this setup:
- Your Identity Provider address (well, part of it)
- Your service account id
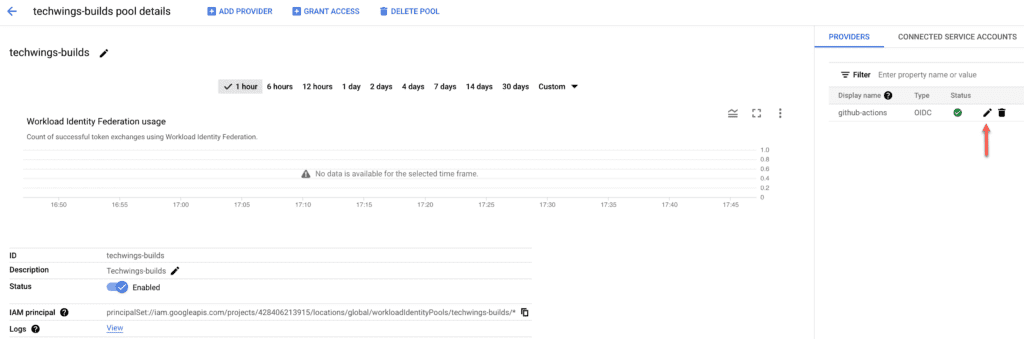
Let’s start with the Identity Provider address. To find this, click on the Workflow Identity Federation menu (search it in the search bar if required) and click on your Identity Pool. Then select the pencil icon for the Identity Provider on the right of the screen, as shown below by the red arrow. This will open the edit screen for your Identity Provider.
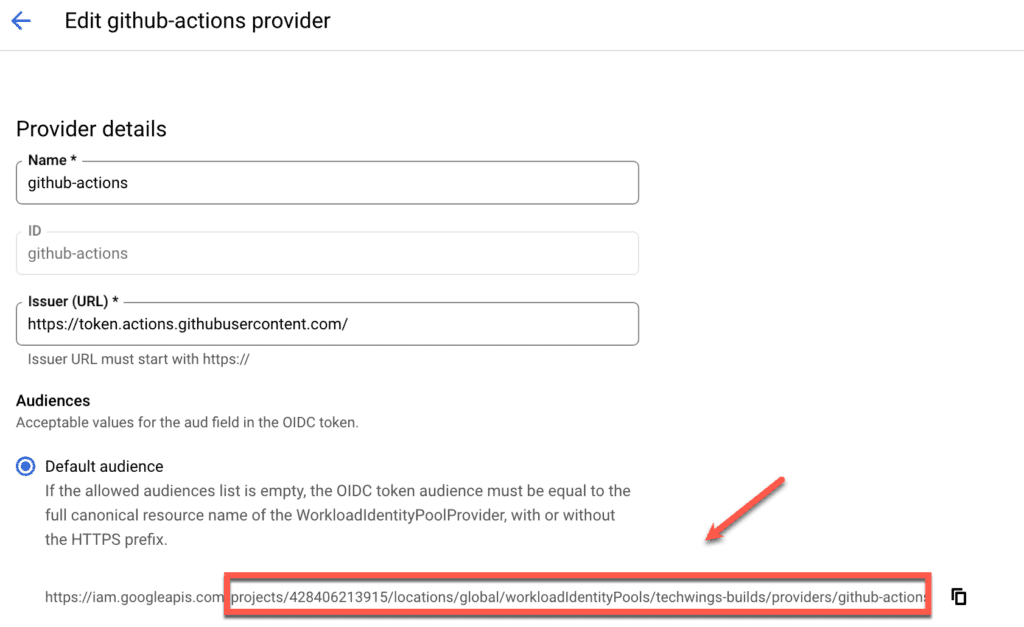
Copy the part of the URL from projects onwards and paste it somewhere where you can copy from later on. Next you will need to select and copy somewhere your service account id. To do so, select “Service Accounts” from the services (you can search for it) and then copy the service account value, as shown below.

Paste this value next to the value of the Identity Provider you saved earlier. Now I will show a GitHub Action and how to use these two values.
					# This workflow will do a clean installation of node dependencies, cache/restore them, build the source code and run tests across different versions of node
# For more information see: https://docs.github.com/en/actions/automating-builds-and-tests/building-and-testing-nodejs
name: Node.js CI
on:
  push:
    branches: [ "main" ]
  pull_request:
    branches: [ "main" ]
jobs:
  build:
    permissions:
      contents: 'read'
      id-token: 'write'
    runs-on: ubuntu-latest
    steps:
      - uses: 'actions/checkout@v3'
      - uses: 'google-github-actions/auth@v1'
        with:
          workload_identity_provider: 'projects/428406213915/locations/global/workloadIdentityPools/techwings-builds/providers/github-actions'
          service_account: 'editor@media-techwings.iam.gserviceaccount.com'
      - name: 'Set up Cloud SDK'
        uses: 'google-github-actions/setup-gcloud@v1'
      - name: Set up JDK 17
        uses: actions/setup-java@v3
        with:
          java-version: '17'
          distribution: 'temurin'
          cache: 'maven'
      - name: Build with Maven
        run: mvn clean test
If you look at the ‘google-github-actions/auth@v1‘ step you will see two entries. One for workload_identity_provider and one for service_account. In the former, paste the value of the identity provider you have saved previously. Note that the value starts with projects/…
In the service_account entry paste the service account id you have saved previously.
Congratulations! You are done! You can now push your code to GitHub and watch while access to your Google resources is authorised without credentials, but through identity federation, a much more secure way to protect your Google projects!
If you have liked this article, please don’t forget to like it, share it on social media and spread the word. Our mission is to share knowledge with fellow technologists and improve the overall quality of software deliery!